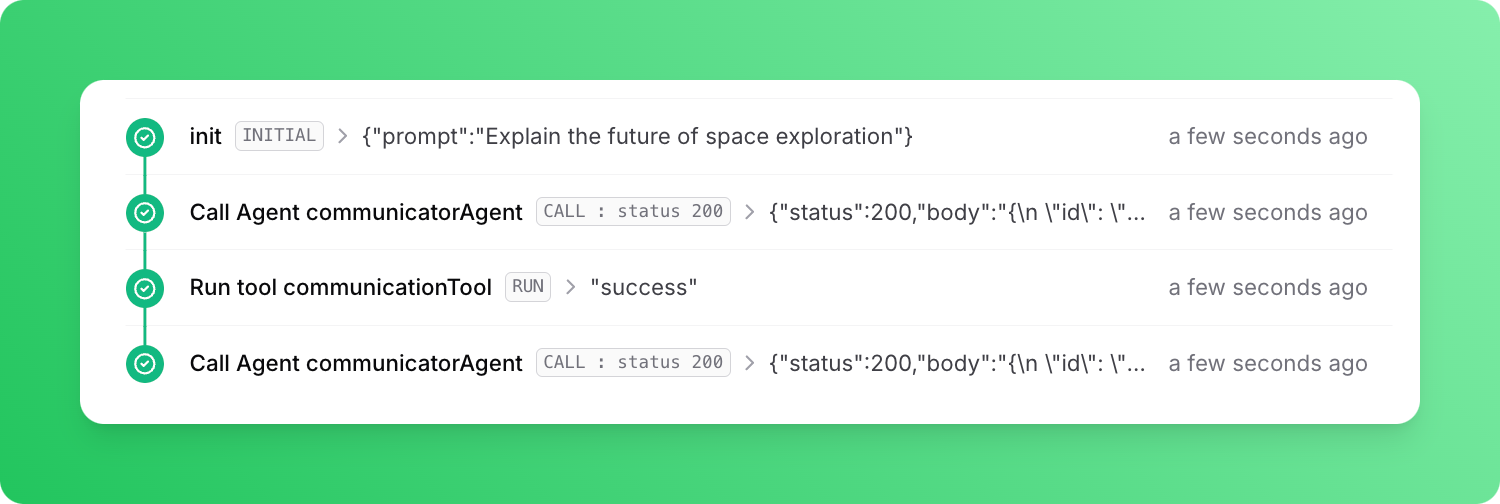
In this guide, we will be using Next.js. If you’re working with a different supported framework, you can find instructions on how to define a workflow endpoint in the quickstarts.
If you’re new to Upstash Workflow, it’s a good idea to start by exploring the Local Development documentation. This guide will help you set up and use Upstash Workflow in a local environment.
Installation
First, create a new Next.js project with:
npx create-next-app@latest [project-name] [options]
npm i @upstash/workflow ai zod
Start Local QStash Server
Next, start the local QStash server with the following:
npx @upstash/qstash-cli dev
Set Environment Variables
Once you start the QStash server, you’ll see QSTASH_URL and QSTASH_TOKEN values in the console. Add these values to your .env.local file together with OPENAI_API_KEY env variable:
QSTASH_URL="http://127.0.0.1:8080"
QSTASH_TOKEN="<QSTASH_TOKEN>"

OPENAI_API_KEY=<OPENAI_API_KEY>
Define an endpoint
Next, we will define the endpoint to run the agent.
import { z } from "zod";
import { tool } from "ai";

import { serve } from "@upstash/workflow/nextjs";

export const { POST } = serve<{ prompt: string }>(async (context) => {
  const prompt = context.requestPayload.prompt
  const model = context.agents.openai('gpt-3.5-turbo')

  const communicatorAgent = context.agents.agent({
    model,
    name: 'communicatorAgent',
    maxSteps: 2,
    tools: {
      communicationTool: tool({
        description: 'A tool for informing the caller about your inner thoughts',
        parameters: z.object({ message: z.string() }),
        execute: async ({ message }) => {
          console.log("Inner thought:", message)
          return "success"
        }
      })
    },
    background:
      'Answer questions directed towards you.' +
      ' You have access to a tool to share your inner thoughts' +
      ' with the caller. Utilize this tool at least once before' +
      ' answering the prompt. In your inner thougts, briefly' +
      ' explain what you will talk about and why. Keep your' +
      ' answers brief.',
  })

  const task = context.agents.task({
    agent: communicatorAgent,
    prompt
  })

  const { text } = await task.run()

  console.log("Final response:", text);
})
Calling the Endpoint
To run the endpoint, first run the Next.js app with:
Then, we call the endpoint using the Workflow Client:
import { Client } from "@upstash/workflow";

const client = new Client({
  baseUrl: process.env.QSTASH_URL,
  token: process.env.QSTASH_TOKEN!,
})

const workflowRunId = await client.trigger({
  url: "http://127.0.0.1:3000/workflow",
  body: { prompt: "Explain the future of space exploration" },
  keepTriggerConfig: true
})

console.log(workflowRunId);
If you are using a local tunnel, replace the url above (http://127.0.0.1:3000)
with the public URL.
Inner thought: I will discuss the future of space
exploration and the potential advancements in
technology and missions.

Final response: The future of space exploration
holds exciting possibilities with advancements
in technology, potential manned missions to
Mars, increased commercial space travel,
and exploration of distant celestial
bodies.
 Each tool invocation and LLM call is a seperate step. Our agent first made a call to OpenAI to decide whether to use a tool or reply right away. OpenAI responded with a request to use the tool
 communicationTool. Tool was executed and OpenAI was called with the result of the tool. OpenAI then responded with the final response. 

